Who Should Use This Article?
This article is intended for:
- SoupedUp Head Office Administrators
- Site Administrators responsible for creating and maintaining Digital Forms.
Permissions Required
You must have permission to create and manage Forms within the Food Safety Module.
Overview
Digital Forms allow organisations to capture operational and compliance information electronically within the Food Safety Module.
Unlike Printable Forms, Digital Forms are completed directly within the application using interactive Form Elements such as text fields, dates, times, checkboxes and initials.
This article demonstrates how to create a Digital Form using an External Transport Record as an example. While this example focuses on food transported off-site, the same process can be used to create any Digital Form required by your organisation.
Before You Begin
Before creating your Digital Form, consider:
- The purpose of the form.
- The information staff need to record.
- Which fields should be mandatory.
- Whether supporting information or evidence is required.
- Which users or sites require access to the completed form.
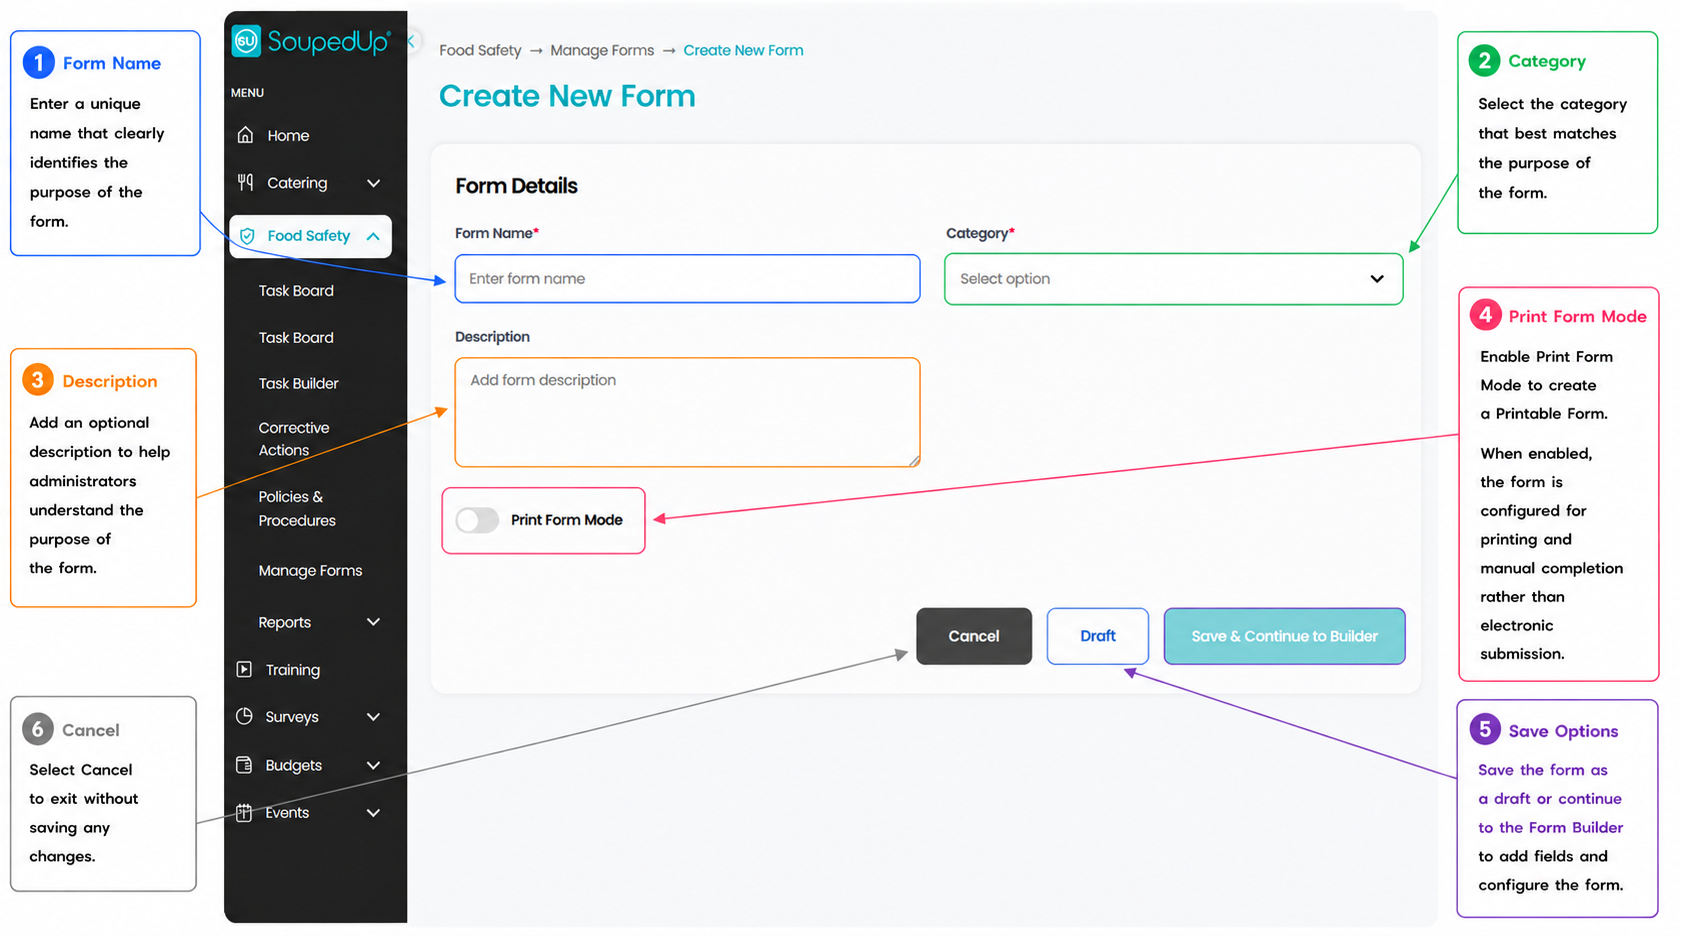
Step 1 – Create a New Digital Form
- Navigate to Food Safety → Manage Forms.
- Select Create Form.
- Enter a unique Form Name.
- Select the appropriate Category.
- (Optional) Enter a Description.
- Ensure Print Form Mode remains OFF.
- Select Save & Continue to Builder.
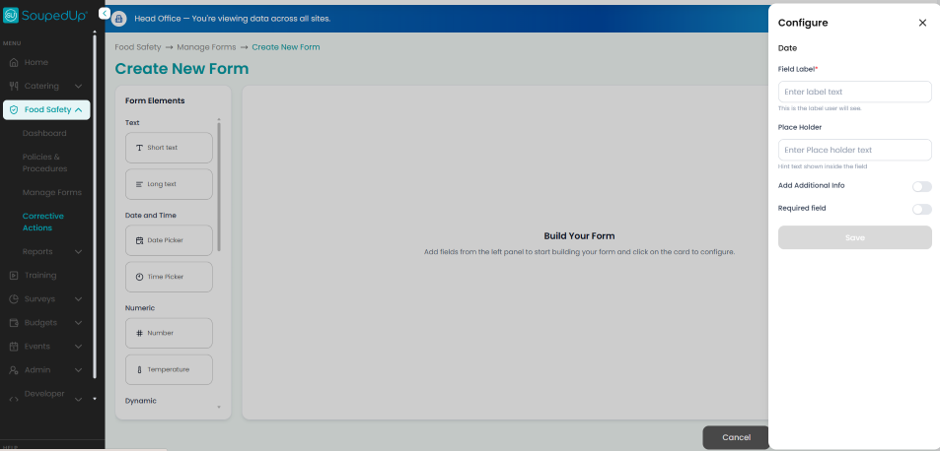
Step 2 – Open the Form Builder
The Form Builder is where your Digital Form is created.
Select a Form Element from the left-hand panel, configure its settings using the Configure Panel, then save your changes. Continue this process until all required fields have been added to your form.

Step 3 – Add Your First Form Element
For this example, we'll begin by adding a Date Picker to record the Date of Food Transport.
- Select Date Picker from the Form Elements panel.
- Enter a meaningful Field Label.
- Configure any additional settings required.
- Select Save.
The field is now added to your Digital Form.
Progress
✅ Date of Food Transport
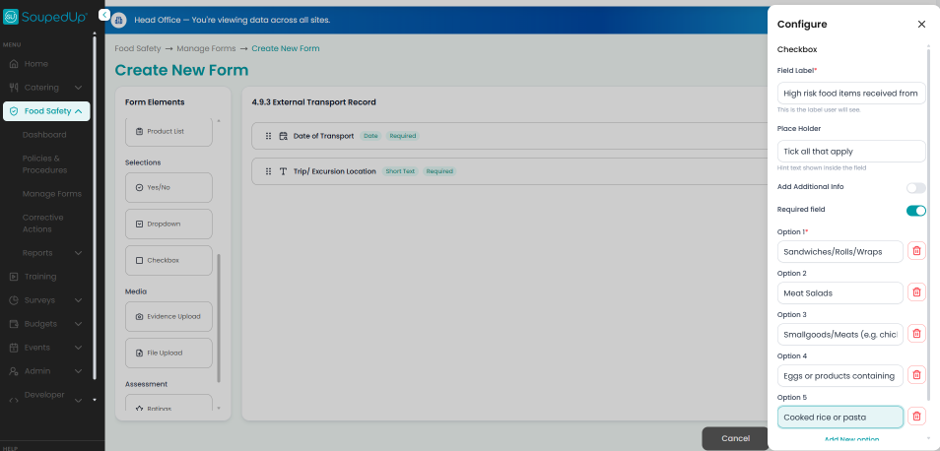
Step 4 – Continue Building Your Form
Continue adding Form Elements required for your workflow.
For this example, we now add:
- Short Text – Location of Trip/Excursion
- Checkbox – High Risk Food Items Received
Each time a Form Element is added:
- Configure the field.
- Review the settings.
- Select Save.
Progress
✅ Date of Food Transport
✅ Location of Trip/Excursion
✅ High Risk Food Items Received

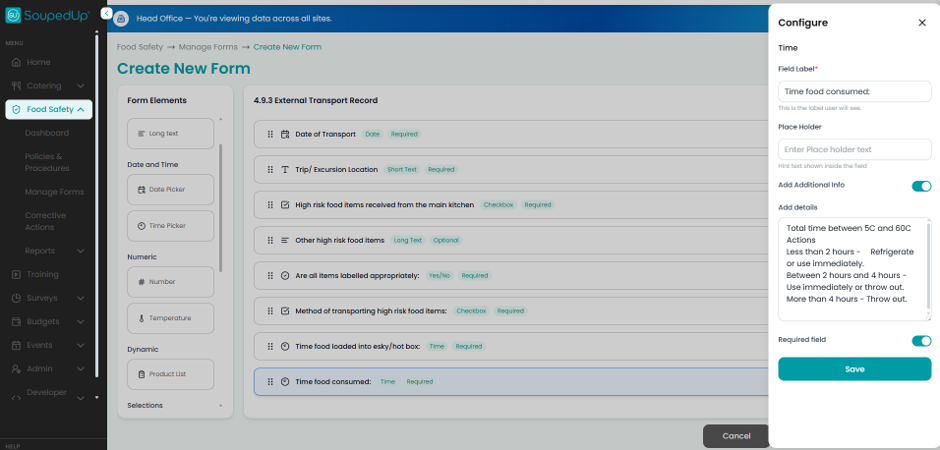
Step 5 – Add Supporting Information
Some Form Elements provide additional detail to help users complete the form.
For this example we continue building the form by adding:
- Long Text – Other High Risk Food Items
- Yes / No – Are all items labelled appropriately?
- Time Picker – Time Food Loaded into Transport
Continue selecting the required Form Elements, configure each field and save your changes before adding the next element.
Progress
✅ Date Picker
✅ Short Text
✅ Checkbox
✅ Long Text
✅ Yes / No
✅ Time Picker
Step 6 – Complete the Digital Form
Finish building the form by adding the remaining Form Elements.
For this example, we complete the form with:
- Time Picker – Time Food Consumed
- Yes / No – Were all food safety requirements met during transport?
- Initials – Staff Initials
- Initials – Food Safety Supervisor Initials
Before publishing, review the completed form to ensure:
- Field labels are clear.
- Mandatory fields are marked as Required where appropriate.
- The form captures all information required by your organisation.
Progress
✅ Date Picker
✅ Short Text
✅ Checkbox
✅ Long Text
✅ Yes /No
✅ Time Picker
✅ Initials
Digital Form Complete ✔
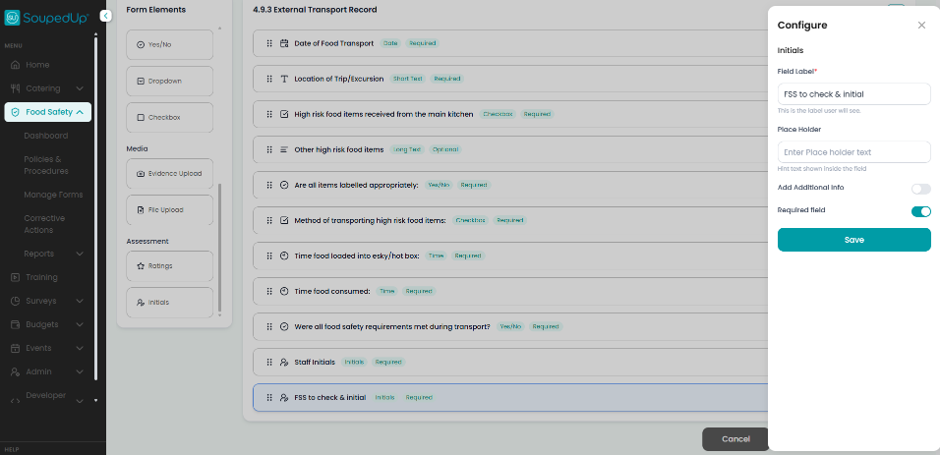
Step 7 – Review the Completed Digital Form
The completed example below demonstrates how multiple Form Elements can be combined to create a practical Digital Form.
Your own Digital Forms may contain different Form Elements depending on your operational requirements.
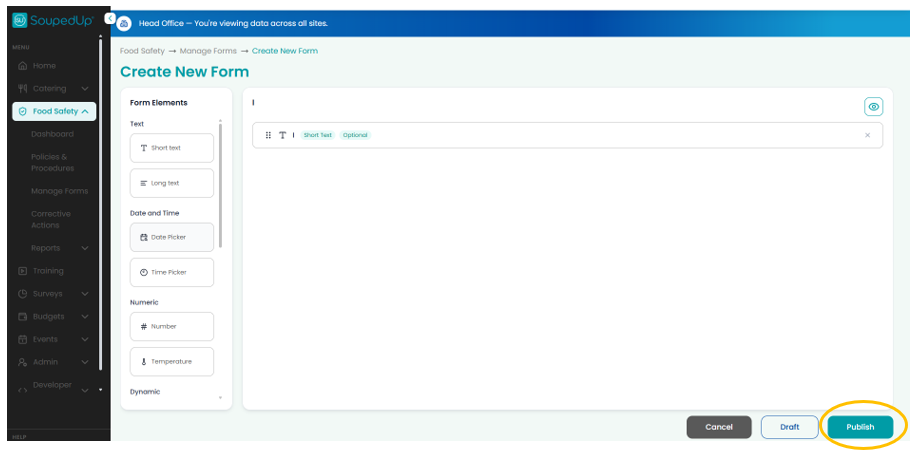
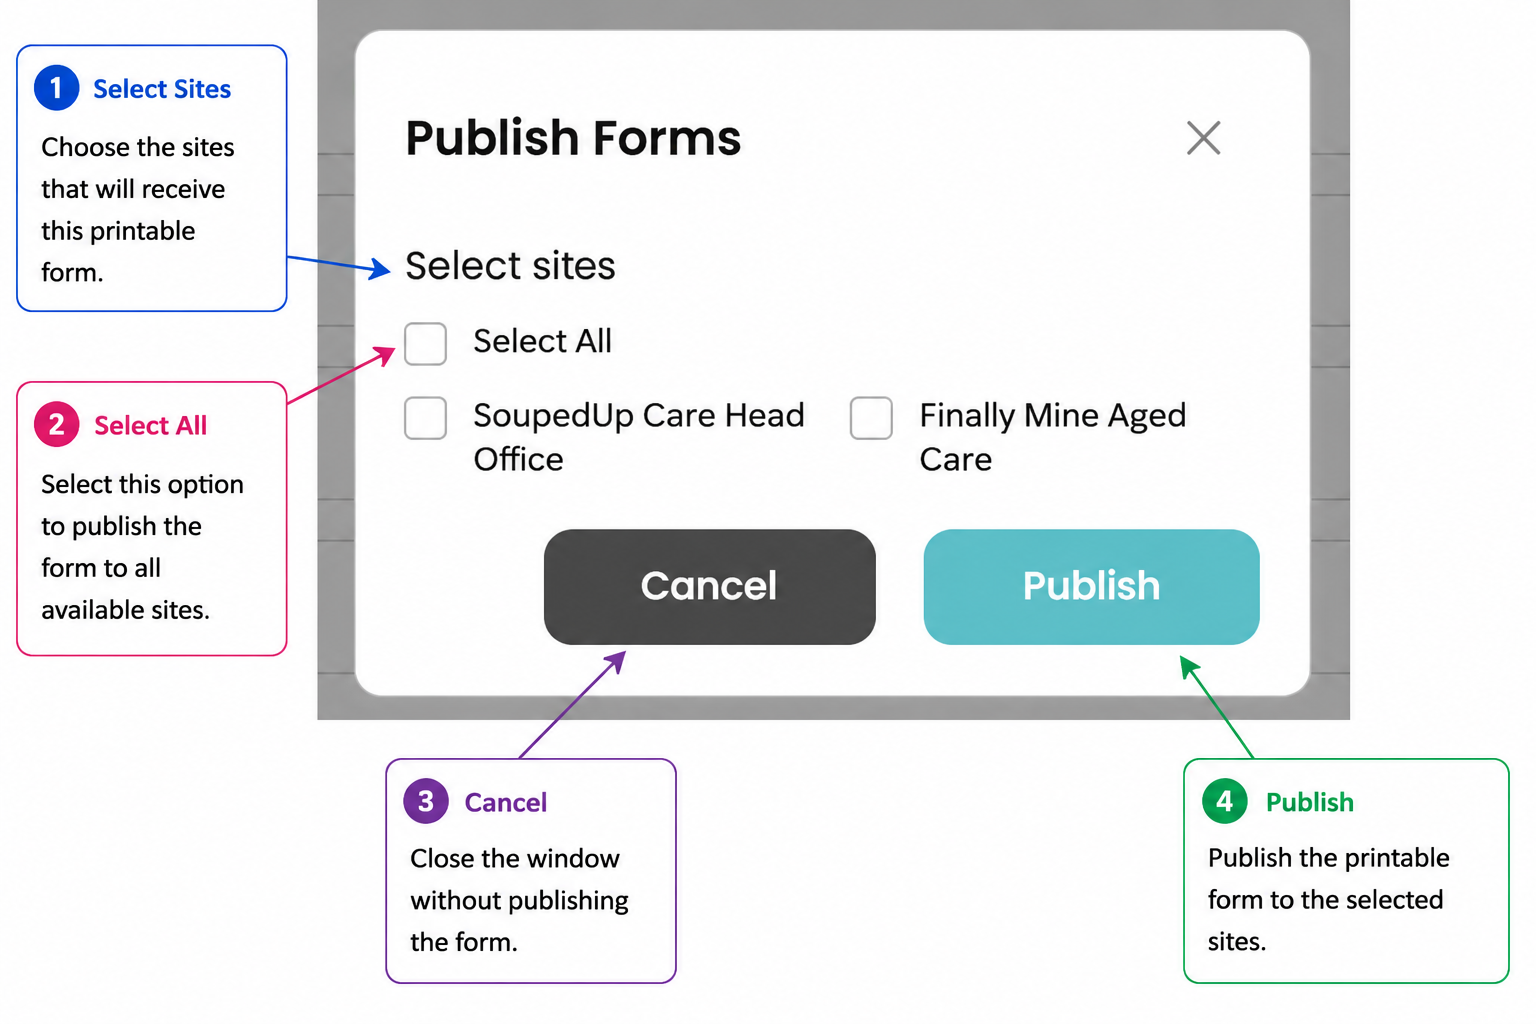
Step 8 – Publish Your Digital Form
Once you are satisfied with your Digital Form:
- Close the Configure Panel if it is open.
- Select Publish.
- Choose the site or sites that should receive the form.
- Select Publish to make the Digital Form available to users.
Other Available Form Elements
The External Transport Record demonstrates several commonly used Form Elements. Depending on your operational requirements, you can also include:
- Number – Record quantities or counts.
- Temperature – Capture food or equipment temperatures.
- Dropdown – Allow users to select a single option from a predefined list.
- Evidence Upload – Attach photographs as supporting evidence.
- File Upload – Upload supporting documents such as delivery dockets or certificates.
- Ratings – Record assessment scores or quality ratings.
- Product List – List products to be checked.
Choose the Form Elements that best support the information you need to capture.
Good to Know
- Digital Forms are completed electronically within the Food Safety Module.
- Leave Print Form Mode switched OFF when creating a Digital Form.
- Head Office can create and publish Digital Forms to one or multiple sites.
- Site Administrators can create and publish Digital Forms within their own site.
- Published Digital Forms can be edited, cloned or updated as operational requirements change.
- The External Transport Record shown in this article is provided as an example only. Select the Form Elements that best suit your own operational and compliance requirements.
Related Articles
Was this article helpful?
That’s Great!
Thank you for your feedback
Sorry! We couldn't be helpful
Thank you for your feedback
Feedback sent
We appreciate your effort and will try to fix the article